Amazon Web Services Tutorial
This tutorial teaches you how to set up a server on Amazon Web Services. You will be doing all of your assignments on your server.
Contact Tutorial
Your contact for this tutorial is Anna Loparev. Please direct questions about this assignment to Anna (see the Contact Page) because she will best know what's going on. You can also always contact Jeff, who may end up forwarding your question to Anna.
Creating an Account
- Go to the Amazon Web Services Homepage.
- Click on
Sign UporSign Up Nowto create an account. Even if you have an existing Amazon account, you will still need a credit card and phone number during the setup process. - Wait until you get an email confirming that your account has been set up.
- Go back to the homepage and click on
My Account/Console -> AWS Management Console. You can now sign in.
Creating a Server
- Sign in.
- Click the EC2 tab.
- Click the
Launch InstanceButton.
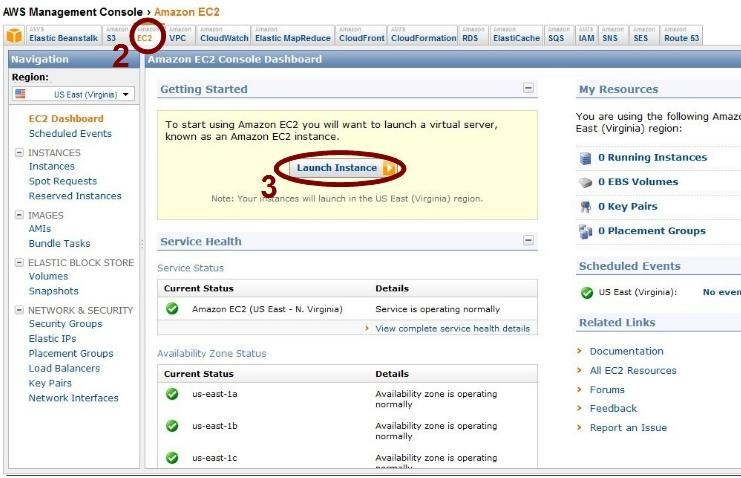
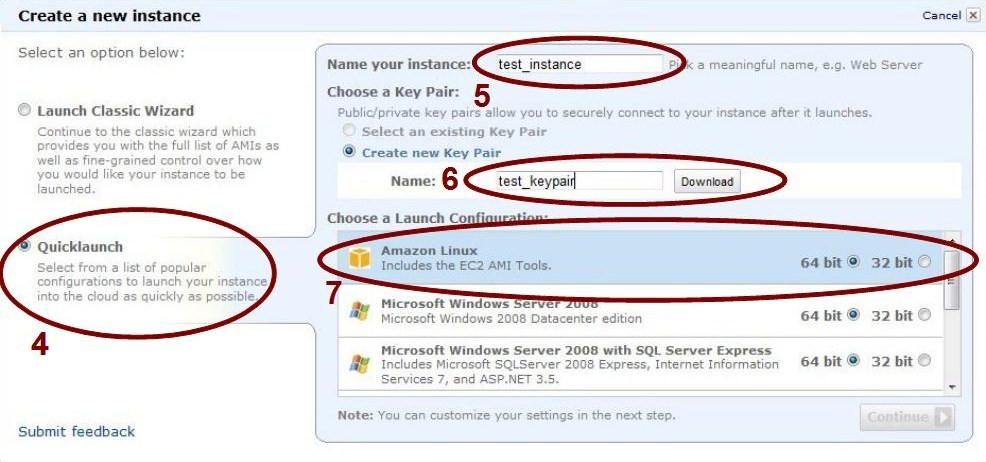
- Quicklaunch should be selected from the left column.
- Give your server a name.
- Make sure
Create new Key Pairis selected and clickDownloadto save the key. - Make sure Amazon Linux 64-bit is selected.
- Click Continue.
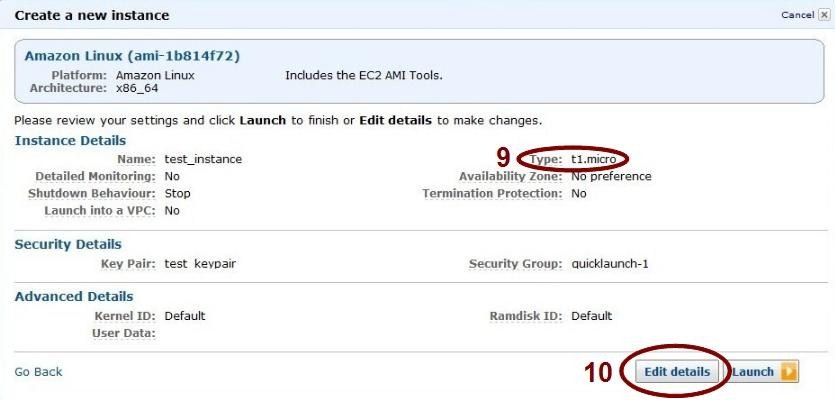
- Double check that the type is
t1.micro. (Anything larger and you get charged.) - Click
Edit details.
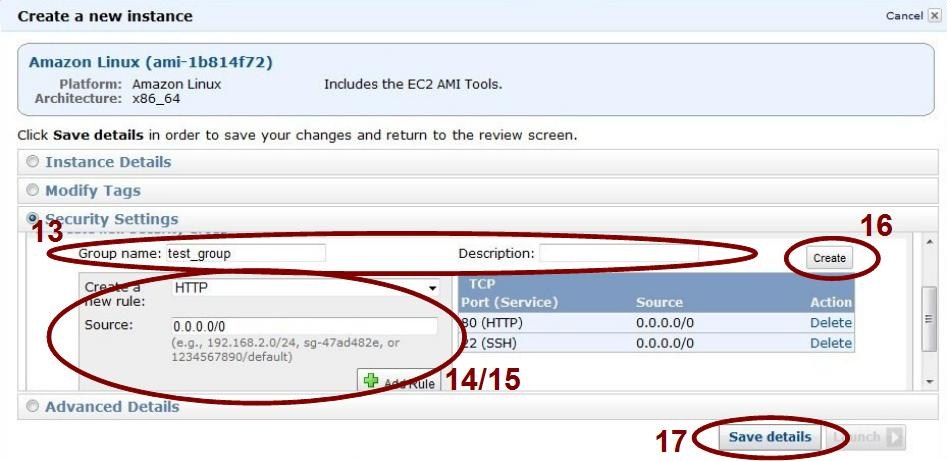
- Select
Security Settings -> Security Groups. - Select
Create new Security Group. - Give it a name and description.
- Add an SSH rule with source
0.0.0.0/0. By setting source to0.0.0.0/0, any computer can access the server. - Add an HTTP rule with source
0.0.0.0/0. - Click
Create. - Click
Save details.
- Click
Launch. - Click
Close.
Connecting to and Setting Up Your Server
- Make sure you are signed in and in the EC2 tab.
- Select
InstancesunderINSTANCESin the left navigation bar. - Click on your server.
- The box at the bottom of the page should be open to the
Descriptiontab. Note the Public DNS value towards the bottom of it.
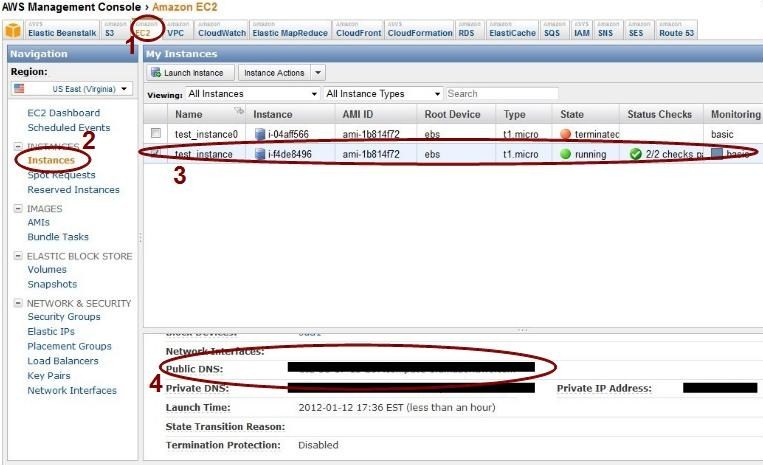
- If you are on a non-Windows system, open X11 for Mac or Terminal for Linux. Use the command line argument
ssh -i /path/to/my/keyfile.pem ec2-user@ec2-##-##-##-###.compute-#.amazonaws.com, where/path/to/my/keyfile.pemis the path to the key file you downloaded andec2-##-##-##-###.compute-#.amazonaws.comis the Public DNS value. Remember to put a space after-iand DO NOT put a space betweenec2-user@annd your Public DNS value. - If you are using Windows, the process is a bit more complicated:
- Download PuTTY and PuTTYgen if you do not already have it.
- Open PuTTYgen by going to
Start -> Programs -> WinSCP -> Key tools -> PuTTYgen. - Select
Conversions -> Import Keyand find your file. - Click
Save private key. Name it something likemyKeyPair, and make sure the type is*.ppk. You will get a warning, but just clickYes. - Close PuTTYgen and open PuTTY and go to
Connection -> SSH -> Authin the left navigation bar. - Click the
Browsebutton near the bottom of the page and select your *.ppk file. - Go back to the
Sessionpage and save the configuration so you don't have to find the key every time you log in. - Now sign in as
ec2-user@ec2-##-##-##-###.compute-#.amazonaws.com, whereec2-##-##-##-###.compute-#.amazonaws.comis the Public DNS value.
- Install the propriate packages on the server using the following commands (where 'password' is whatever you want your mysql password to be):
sudo su yum install httpd yum install mysql-server mysql yum install php php-mysql service httpd start service mysqld start /usr/bin/mysqladmin -u root password 'password' - Use the following commands to give yourself permission to upload your files to your server:
cd ../../var/www chown ec2-user html/ - To make sure the server is working, type
http://ec2-##-##-##-###.compute-#.amazonaws.cominto your web browser, whereec2-##-##-##-###.compute-#.amazonaws.comis the Public DNS value. You should see a test page. If your browser times out, go toSecurity Groupsin the left navigation bar on your AWS EC2 tab and make sure the security group you set up for your server has the http rule. If not, add it and don't forget to click theApply Rule Changesbutton.
Uploading Your Files
- If you are on a non-Windows system, log out of your server by using the command
exituntil you are back to your local machine, and then use the command line argumentscp -i /path/to/my/keyfile.pem /path/to/my/copyfile.txt ec2-user@ec2-##-##-##-###.compute-#.amazonaws.com:path/to/assignment/folder, where/path/to/my/keyfile.pemis the path to the key file you downloaded,ec2-##-##-##-###.compute-#.amazonaws.comis the Public DNS value, and /path/to/assignment/folder is the path to your assignment folder on your server. /path/to/assignment/folder should start with ../../var/www/html. If you just want to test a file to make sure your server is working, just use the path ../../var/www/html. - If you are using Windows, the process is a bit more complicated:
- Download WinSCP if you do not already have it.
- Open WinSCP.
- Set
Host nametoec2-##-##-##-###.compute-#.amazonaws.com, whereec2-##-##-##-###.compute-#.amazonaws.comis the Public DNS value. - Set
User nametoec2-user - Press the
...button at the end of thePrivate key filebar and find your *.ppk key file. - Click the
Savebutton at the bottom of the window so you don't have to enter all of the information every time you log in. - Click
Login. - Navigate to the html folder by going through the following folders:
.. -> .. -> var -> www -> html. From here you should see your assignment folders if you have created them. If you want to test a file to make sure your server is working, just put it into this folder.
If You Have Trouble
Try some of the following:
- Make sure you have set up the SSH and HTTP rules with location 0.0.0.0/0.
- If you changed the SSH and HTTP rules, then make sure you not only clicked the
Add Rulebutton, but also theApply Rule Changesbutton. - Make sure you chose the correct key when signing in.
- Make sure the name of your key and the names of all of the folders in the path to your key are one word.
- Make sure the path to your key is correct.
- Make sure you put a space after "-i" for ssh and scp.
- Sign in as root instead of ec2-user.
- Set the key permissions to 400 (only readable, and only by you).
- Make sure you are installing the packages on the server, not your local computer.
- Retype the installation commands.
- Make sure you include your key when doing the scp command.
- If you are using TextEdit, make sure you change the properties so that files are saved as plain text. You can find instructions for this online.
Props
This document is based on the tutorials and posts at imperialWicket, Cloud Computing Info, Coding This, and the AWS Forum.

